Table of Contents #
Seamlessly connect your WooCommerce store with Invoize Pro to automate invoice creation, streamline customer management, and enhance your billing workflow. This integration allows you to leverage your existing WooCommerce data to create professional invoices with minimal effort.
Step 1: Install and Set Up WooCommerce #
The first step is to make sure your WooCommerce store is installed and ready to go.
Install the WooCommerce Plugin: #
- From your WordPress dashboard, navigate to Plugins > Add New.
- In the search bar, type “WooCommerce”.
- Find the official plugin by Automattic, then click Install Now and wait for the installation to finish.
- Next, click Activate to enable the plugin.
Initial Store Setup: #
- Follow the setup wizard that appears to configure your store’s basics, such as your location, currency, payment methods, and shipping options.
- Make sure you create at least one product to enable all of the store’s full functionality.
Step 2: Configure Your Online Store #
Ensure your store has all the necessary data for a smooth integration.
Product and Page Setup: #
- Add products with clear names, descriptions, prices, and images.
- Make sure essential pages like Shop, Cart, Checkout, and My Account are configured.
Preparing for Integration: #
- Confirm you have at least one published product.
- Have a payment gateway and shipping options configured.
- Establish any necessary tax rules.
Step 3: Create Invoices from WooCommerce Orders #
Requirement: You must have at least one completed WooCommerce order.
- Go to WooCommerce > Orders from your WordPress dashboard menu.
- Find the order you want to create an invoice for.
- Click the + Create Invoice button.
- The invoice will be automatically filled with customer data, ordered products, pricing, totals, and other details.
- You can review the details and make adjustments if needed, then click Save.

Step 4: Utilize WooCommerce Customer Data #
Invoize Pro automatically syncs customer data from your store, saving you time when creating new invoices.
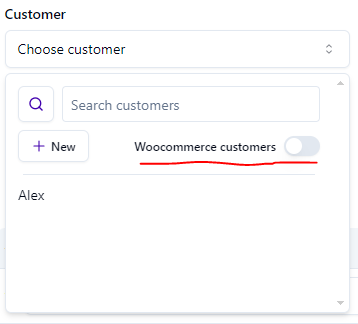
- When creating a new invoice in Invoize Pro (Invoize > Invoices > + Create Invoice), enable the WooCommerce Customers option in the customer selection section.
- You can search for customers by their name or browse the list.
- Once you select a customer, their billing address and contact information will be automatically populated.
Step 5: Add WooCommerce Products to Invoices #
To add products from your WooCommerce store to an invoice, follow these steps:
- Product Requirement: You must have at least one product created in WooCommerce.
- Access the Invoicing Section:
- In your WordPress sidebar, go to Invoize > Invoice.
- Click the + Create Invoice button to enter the invoicing section.
- Find the Product:
- In the Choose product dropdown menu, turn on the WooCommerce customers option.
- You can then select your existing products from WooCommerce.
- For easier searching, you can also type the product name into the search bar.

Contact Us #
Support: If you have any questions, need assistance, or would like to share feedback, you can click here.